Home » Articles posted by Olivia Wilson
Author Archives: Olivia Wilson
Plumbing 101: Key Tasks and Responsibilities Explained
Plumbers Longview WA install and repair pipes, fixtures, and appliances in homes, businesses, and industrial facilities. Their work ensures water supply, drainage, and waste disposal systems function properly to provide occupants with safe and clean conditions.

They also inspect plumbing systems to identify and resolve problems. This career requires strong customer service skills and the ability to think analytically and problem-solve.
Plumbers work on plumbing systems that distribute water, gas, and waste in residential, commercial, and industrial settings. They are responsible for ensuring the functionality and efficiency of these systems, which facilitate clean water supply, effective drainage, and safe operation of appliances like dishwashers and water heaters. They also install and repair backflow preventer devices to ensure the safety of potable water supplies.
Plumbers can choose to work for plumbing companies that specialize in either residential or commercial projects, or they can go independent. This allows them to select the type of work they enjoy most and maximize earnings potential. Plumbers who are experienced and skilled can often command higher hourly rates than beginners.
A career as a plumber can be physically demanding and stressful. The nature of the job requires plumbers to crawl into tight spaces, maneuver around obstacles, and physically lift and carry heavy objects. They are also often on-call for emergency situations, which can disrupt their schedules and cause them to work extra hours.
In addition to the physical demands of the job, plumbers must be comfortable working with a wide range of tools and materials. They use a variety of hand and power tools to cut, measure, and shape pipes; and they must be capable of soldering and welding. Plumbers also use electronic testing equipment to diagnose problems and locate sources of leaks, blockages, or other issues.
Plumbers must also be knowledgeable about local codes and regulations to ensure the proper installation of plumbing fixtures and systems. They may also be required to interpret blueprints and plans to determine the necessary materials and process for a particular project. Plumbers who specialize in kitchen and bathroom remodeling may be called upon to install aesthetically pleasing fixtures and faucets, as well as to connect them to the existing plumbing system.
In addition to technical knowledge and skills, plumbers must be able to effectively communicate with clients and other professionals to understand their needs and provide the best solutions. This requires good interpersonal skills, which can help them build rapport with customers and negotiate pricing.
Education and Training Requirements
A plumber’s job can be rewarding, fulfilling and lucrative. The BLS reports that plumbers are among the highest-paid trade workers. Whether you’re a beginner or an advanced plumber, if you want to get into this career you’ll need the proper training and certification. You can get the training you need through a formal union or trade organization apprenticeship, a college degree program or on-the-job training with a licensed master plumber.
Before beginning your training, you’ll need a high school diploma or GED certificate. You can then enroll in technical or vocational courses at a trade school, community college or through professional plumbing associations. Such programs typically include fundamentals such as piping systems, tools, materials and safety procedures. They may also include more specialized training in areas like pipefitting, sewage systems, water treatment and other related subjects.
If you’re interested in entering a formal apprenticeship, you can contact local unions and the Office of Apprenticeship at the Department of Labor. These programs often last five years and combine on-the-job training with classroom instruction. Some programs even offer certification in specialized fields such as gas plumbing or steam fitting.
Other alternative approaches to gaining practical experience in the field are to explore job websites or to contact plumbing companies directly about internships. Some high schools and BOCES (Board of Cooperative Educational Services) CTE (Career and Technical Education) programs also offer pre-apprenticeship preparation.
In addition to acquiring a license and meeting local or city regulations, plumbers should obtain specialized certifications in such fields as green plumbing and advanced piping techniques. They should also keep abreast of new technology and trends in the field by participating in continuing education. Depending on the size of their company or organization, plumbers should consider getting workers’ compensation and general liability insurance to cover any damage caused to property while working at a job site.
Job Duties and Responsibilities
The job duties and responsibilities of plumbers focus on the installation, maintenance and repair of plumbing systems. This involves assembling and installing pipes, fixtures and appliances for water, gas, steam and air in residential and commercial buildings. It also encompasses repairing or replacing these items, as well as ensuring compliance with local and national plumbing codes and standards. In addition, plumbers may also be responsible for inspecting and testing heating and plumbing equipment.
The plumber must possess a variety of skills to perform these tasks, including an understanding of the science behind water flow and the use of different tools. It is also important for the plumber to have strong critical thinking and problem-solving abilities, as well as a solid grasp of plumbing codes and regulations. The plumber is also required to be comfortable working in tight spaces and dealing with hazardous materials.
In most cases, a high school diploma or equivalent is the minimum educational requirement for becoming a plumber. However, some individuals choose to attend technical or trade schools to receive a more in-depth education on plumbing. These programs often offer training on a variety of topics, including plumbing code knowledge, blueprint reading, safety practices and the theory behind water supply and drainage systems.
Plumbers are expected to complete an apprenticeship and become licensed in their field. This typically requires passing an exam and gaining work experience under the supervision of an experienced plumber. Some plumbers also pursue additional certifications to demonstrate their expertise in specific areas of the profession, such as working with natural gas lines or steam fitting.
Plumbers in private industry are employed by construction and engineering firms, plumbing supply houses, manufacturers, restaurants, retail stores and other businesses. In this role, they must be able to communicate effectively with customers, as well as work alongside contractors and other team members on large projects. They may also be responsible for estimating project costs and developing budgets. Additionally, plumbers must be able to meet deadlines and manage customer expectations. In some cases, plumbers are called upon to respond to emergency calls at any time of day or night.
Working Conditions
Plumbers have to work outside in all weathers, often in cramped spaces, and must wear the correct protective clothing for the environment and potential hazards. Plumbers also need to be physically strong to lift and carry heavy equipment and parts. Injuries caused by slips, trips and falls are common and can include bruises, sprains, broken bones and head trauma. Manual handling of tools and materials can lead to back injuries. Plumbers must also be aware of the risk of exposure to hazardous chemicals and materials such as sulfur dioxide, drain cleaners, solvents, lead, asbestos and contaminated soil and water. They should receive appropriate health and safety training relevant to their role, including instruction on how to recognise and avoid these risks.
Working with sewage is a particular risk, as it contains viruses, bacteria, funguses and parasites that can cause hepatitis, gastroenteritis and other illnesses. Plumbers should be fully trained in sewage management and work only with authorised sewage contractors.
Other hazards include the use of power tools, which can cause vibration, and working at heights – especially when ladders are used – which can lead to serious injury. Plumbers must always use the safest method possible to access elevated areas such as roofs and under buildings, and consider using framed scaffolding where this is an option.
Plumbing work can bring plumbers into contact with electricity, which is a major hazard unless all electrical systems are isolated before commencing work. Plumbers should never get too close to live electrical cables and switches, and be sure they switch off the power before working on any electrics.
Plumbers may also be exposed to a range of noise-induced injuries, such as hearing loss and tinnitus. Protective earplugs can help, as well as taking regular breaks to limit exposure and wearing hearing protection when operating power tools. Plumbers should also be aware of the risk of over-exertion, and ensure they take adequate rest breaks to avoid heat exhaustion when working outdoors in hot weather. They should drink plenty of water to prevent dehydration, and try not to work outdoors at midday when the sun is at its hottest.
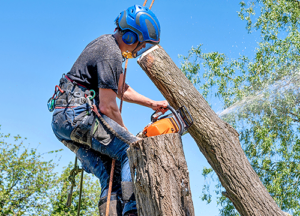
How to Safely Cut a Tree
You’ll need the right equipment. Also, be sure you’re not cutting a tree near power lines—those can fall on you or your saw.
Start by making a shallow notch in the side of the tree you want it to fall. The notch should be about 1/3 or 1/4 of the tree’s diameter. Contact Tree Cutting Irvine now!
A healthy tree provides shade, cleans the air, and can help to reduce soil erosion. But if a tree is unhealthy, it can pose a hazard to people and property. A professional arborist performs a risk assessment and can provide recommendations to minimize the threat to nearby structures. A proper evaluation should include a thorough inspection of the entire tree. A professional should also evaluate whether the tree has any potential hazards, such as a dangerous lean, proximity to power lines, or other structural defects.
A general rule is that if more than 50% of the tree is dead or dying, it’s time to cut it. However, this varies by species and the individual tree’s history. Other indicators that a tree may be unhealthy or about to fail are if the trunk has major cavities, fungus growing on the bark, mushroom rings at the base of the trunk, or large swaths of missing bark.
Examine the entire tree for signs of damage, disease, or pest infestation. The appearance of a tree should be normal for its species and location. Occasionally, homeowners may be concerned about non-defects, such as needles turning yellow or separating bark, but these occurrences are typically natural and nothing to worry about.
Observe the natural lean of the tree and determine its fall zone, an area at least twice the height of the tree that can be cleared without damaging property or injuring people. A sudden change in a tree’s lean can indicate breakage and should be evaluated immediately by an arborist.
Look at the root zone to assess the condition of the roots. A healthy root system is a strong indicator of overall tree health. Roots that extend close to the base of a trunk or in a direction away from it are indicative of root diseases.
An arborist can use tools such as an air spade to expose the trunk flare and remove girdling roots that threaten the stability of the tree. Identifying these issues is vital to the safety of the tree and the surrounding area.
Determine the Falling Zone
A good tree felling plan requires a clear escape route. In fact, 90% of all accidents that occur during a tree felling happen within 15 seconds after the back cut and within 5 ft of the stump or trunk (or in the case of a falling tree, the fall zone). The escape route is a path of retreat away from the area where the tree will land when it falls. It must be a clear, unobstructed path and it should be used immediately as the back cut is made.
The first step in determining the fall zone is to evaluate the lean and load of the tree. A heavily loaded tree with a narrow base is more likely to topple during cutting than one that is well balanced and not overloaded.
Also, take note of any obstacles in the area that could be impacted by the falling tree – structures such as buildings and power lines; pavement; outdoor furnishings; and other trees. Ideally, these should be moved before the tree felling starts. It is important to assess the strength of the wind, as it can impact the direction of a falling tree.
Once the hazards have been identified, walk around the tree looking outward for things that the tree (or its branches) may strike when it falls. These include: buildings, cars, and people on the ground; power lines above; other trees that could change the direction of the fall; and debris (such as dead branches or old limbs hanging up in the canopy) that could change the direction of the fall.
Once the hazards and escape route are determined, mark the area that will be the fall zone with a flag or some other method of marking the location. The fall zone should be at least twice the height of the tree, allowing sufficient space for it to land without damaging objects below it. If it is not possible to establish a two-tree length zone, it is best to skip the felling and call a professional. If you do proceed, look up in the canopy for “widowmakers” — dead branches hung up there that are likely to drop as the cutting shifts the balance of the tree toward falling.
Make the Notch Cut
When it comes to felling trees, a lot goes into the process beyond just whipping out your chainsaw and getting to work. Various factors can influence where the tree will fall and how it will fall, including the way it’s leaning, obstacles in its path like power lines or roads, and other environmental variables. Felling a tree is dangerous work and it’s important to make the right decisions to ensure your own safety as well as that of everyone in the vicinity.
In order to direct the direction a tree falls, you must first create a directional notch cut. This is done by cutting a V-shaped opening with your chainsaw into the side of the tree at an angled angle. A directional notch will help to guide the tree as it collapses because it provides a hinge point that helps the trunk move in a certain direction.
The most common directional notches include the Conventional, Humboldt, and Open-Faced notch. Choosing which one to use depends on the lay of the land, desired stump height, and whether you want the hinge to remain intact until it hits the ground. The Conventional notch, also known as the traditional cut, is an older technique that has been used by loggers for centuries. This notch features a conventional top cut and a bottom cut, which meet just above the apex of the v shape. This notch allows for a greater amount of control but it doesn’t offer the same flexibility in how it guides the tree to the ground.
Another popular directional notch is the Humboldt notch, which is similar to the Conventional notch but offers more flexibility in how it guides the tree. This notch features an angled top cut and a horizontal bottom cut that meets just above the apex of the V shape. The upside of this notch is that it can help prevent the hinge from catching on an obstacle as it collapses, which can happen with the Conventional and Open-Faced notches.
Lastly, the open-faced directional notch is an ideal option for flat or sloping terrain because it can provide more accuracy in how the tree will fall than other notches do. This notch is made by first making the top angled cut and then aiming the saw to the bottom of the V. Once the saw penetrates the top of the angled notch, it’s a good idea to pound wedges into the kerf behind the bar to further protect the saw from the pressure of the falling tree.
Make the Falling Cut
The falling cut, or the undercut, is the first of two cuts you will make to fell a tree. It determines the direction the tree will fall. Start with a horizontal cut, about chest height, on the side of the tree facing the desired direction. Then cut about one-third of the way into the tree at a 45 to 60-degree angle. This creates a wedge-shaped cut out of the face of the tree.
The undercut should be deep enough to prevent the tree from falling on itself, but it should not extend past where the top of the undercut comes together with the bottom of the undercut. A standard undercut is a V-shaped cut, but an obtuse or reverse undercut can be used as well.
It is important to clear the surrounding area where the tree will fall. Branches, stumps and other debris can get tangled in the saw blade or trip you as the tree falls. It is also a good idea to clear an escape route, at least two feet wide, on the non-falling side of the tree.
You will need to decide how high you want the tree to fall. Cutting it too high makes it more likely to slam into the ground or other trees, and can make the wood less valuable if you are cutting for lumber. It is difficult to control the fall path of a tall, leaning tree and it can cause damage or injury if it hits structures, such as houses, cars or other trees.
It may be helpful to enlist a helper when felling a large, difficult or dangerous tree. A lookout can keep an eye on the tree and tap you on the shoulder when it is time to make a fall cut, helping you to avoid dangerous situations. They can also be a valuable safety check, alerting you to potential hazards such as loose branches, diseases or cracks in the trunk. A lookout should be familiar with the felling process and able to assist you in making a proper undercut or obtuse cut, if necessary.
Unlocking the Secrets of Body Butter: Benefits, Ingredients, and Uses
Body butters contain occlusive ingredients that lock in moisture to keep skin soft and smooth. They typically contain more oils than lotion or creams and can be thicker in consistency.

This luxe pick features a whipped trio of shea, cocoa, and mango butters that soothe achy muscles and boost collagen production to reduce stretch marks. Plus, it’s formulated without fragrance, parabens, phthalates and mineral oil. Click Here for more information.
As the name suggests, body butter is a cream-like product that offers intense moisturization for the skin. It is a perfect option for those with dry and parched skin. It replenishes the natural moisture of the skin and locks it in. It is also a great choice for people who are suffering from other skin problems like itchy and flaky skin. This natural product is free from chemicals, which means that it is safe to use even for those with sensitive skin.
It contains a high percentage of fatty acids and vitamins that are known to nourish the skin, keeping it healthy. These nutrients also help in reducing stretch marks, scars and other signs of aging. Using body butter on a regular basis can give your skin a soft, smooth and youthful look.
The best way to use body butter is immediately after taking a shower or bath. It can be applied all over the body or concentrated on trouble spots, such as the knees, elbows and feet. You can even apply it after shaving to prevent razor burn.
Unlike lotions, body butter is thicker and almost solid at room temperature. It is usually made from natural butters, such as shea or kokum, and oils, such as coconut or olive oil. Some people may add essential oils to create a unique scent and make the product more appealing.
It is important to read the label of the product before purchasing it. It should say whether it is intended for dry or normal skin. It should also tell you how often it is recommended to be used. Those with oily skin can generally stick to using lotion instead of body butter, while those with extremely dry skin should use it daily.
When choosing a body butter, it is best to opt for one that is organic and natural. It should also be free from sulfates, parabens and other harsh chemicals. It should also be fragrance-free to avoid causing further irritation to the skin. Look for ingredients such as shea and cocoa butter, which are known to offer additional benefits for the skin.
Ingredients
In order to make a body butter, you will need some solid oils (such as shea or mango), liquid oil (like avocado or grape seed) and optional add-ins like essential oils and vitamin E. These ingredients are combined in a double boiler or in the microwave until they are completely melted. Then they are poured into a mixing bowl and whipped to create a soft, light texture. Then the mixture is poured into jars or tins with lids and stored in a cool, dry place.
There are a number of different body butters on the market. You should choose one that suits your skin type and preference. It is also important to look for a body butter that contains natural ingredients and is free of harmful chemicals and preservatives.
For extremely dry skin, a high-performance body butter that combines multiple plant-based ingredients is a great option. The Caudalie Vinotherapist Moisturizing Body Butter is a vegan, paraben-free and cruelty-free option that provides a rich, cushiony texture that deeply moisturizes in the short term and in the long run. This option includes shea butter, desert date oil and sunflower seed oil which all promote healthy skin, while jojoba oil and kokum and tacuma butters balance skin’s natural oil production.
This product can be used by both men and women, and is suitable for all skin types. It is a luxurious and gentle solution to dry skin that can be easily massaged in. This body butter also contains a blend of natural fragrances, making it a good choice for sensitive skin.
Alternatively, you can opt for a body butter that is made with naturally scented essential oils. A few drops of a favorite scent can help to soothe and relax the skin. This option is a great choice for people with sensitive, dry or itchy skin and is also suitable for use during pregnancy as it can be easily absorbed by the skin.
When selecting a body butter, you should also consider whether it is free of comedogenic ingredients that can clog pores. According to Geeta Yadav, MD, dermatologist and founder of Facet Dermatology, the best choice is a non-comedogenic formula that has a rich plant oil base, including shea, cocoa and mango butters. This option is available in unscented and fragrance-free varieties.
Preparation
Body butter is a rich and luxurious skin treatment that deeply moisturizes. It can be applied after a shower or bath and is especially effective for dry areas, such as the legs, arms, hands, feet and neck. Its natural ingredients can also help to improve skin elasticity, reduce the appearance of stretch marks and protect against environmental pollutants and sun damage.
Body Butter can be made at home using a variety of different butters and oils, such as shea butter, mango butter, murumuru butter and cocoa butter. It can be scented with essential oils or with a fragrant fragrance extract, such as vanilla. It can also be infused with herbs, spices and other natural ingredients, such as calendula extract or rosehip oil. Alternatively, natural colorants like micas or oxides can be used to add color and a mild scent.
The ingredients of body butter are typically mixed in a large bowl until they begin to solidify, but are still soft and pliable. This mixture is then whipped with an electric mixer until it achieves a light and fluffy consistency, similar to that of whipped cream. This will take several minutes, and it is important to be careful not to over-whip the mixture, as this can cause it to lose its structure. The addition of a stabilizer, such as arrowroot, is often useful to prevent the body butter from melting once it has been placed in a container.
Once the body butter is whipped, it is poured into clean, dry containers and sealed tightly. It can be stored in a cool, dark place to extend its shelf life. It is also recommended that it be labeled with the date it was made and a list of its ingredients, to avoid contamination or spoilage.
If the body butter contains essential oils, a preservative, such as Optiphen or Leucidal Liquid SF, may be added according to the manufacturer’s instructions. This will help to inhibit the growth of harmful microorganisms that can cause microbial infections and other undesirable reactions in the skin. However, it is important to note that the shelf life of body butter is primarily determined by the expiration dates of the individual butters and oils used.
Application
Body butter is thicker than body lotions and moisturisers, and is typically made with shea or cocoa butter and other vegetable-based oils and butters. It is a luxurious skin care product that is often used to treat specific skin conditions such as eczema, psoriasis, and sunburned or wind-burnt skin. It may also help to reduce stretch marks, scars, and other imperfections in the skin.
There are many types of body butter available, and each formulation offers a unique set of benefits. Shea butter, for instance, is known for its intense hydration and anti-inflammatory properties, while cocoa butter has a rich, creamy texture and a delicious chocolate aroma. Other popular body butter varieties include coconut butter, avocado butter, and mango butter. Body butters can be formulated with a variety of essential oils, which add to their overall aroma and provide additional skin benefits.
To get the most out of your body butter, it is important to apply it correctly. The best time to do this is immediately after a shower, while your skin is still damp. This will ensure that the body butter absorbs into the skin quickly and efficiently. It is also recommended to use a generous amount of body butter on particularly dry areas of the skin such as the elbows, knees, and hands.
Once your body butter is applied, it is recommended to allow it to fully absorb into the skin before putting on clothes or getting dressed. This will give your skin a luxurious, hydrated glow. In addition, applying body butter on a regular basis can assist with the prevention of dryness and itching due to skin conditions such as psoriasis and eczema.
It is also important to store body butter properly, as exposure to heat and humidity can affect its texture and consistency. It is recommended to store body butter in a cool, dry place away from sunlight and heat sources, and to tightly seal the container after each use to prevent air and moisture from entering. This will help to extend the shelf life of your body butter and maintain its hydrating, nourishing effects on the skin.